This DIY clipboard is such an easy craft! This tutorial will show you how it’s done with Mod Podge – and it makes a great teacher’s gift.
Skills Required: Beginner. I recommend doing a test with a scrap piece of wood and paper if you have never Mod Podged before, so you can make sure you don’t get wrinkles. Otherwise, you’ll be good to go! This is relatively simple.

Let’s be honest – you could have a brown, boring clipboard – or you could have something quite a bit cooler. Basic brown doesn’t work for me, so in this post I’ll teach you how to make a DIY clipboard. I had a teacher in mind when I was making it: my mother!
She was a fifth grade teacher for years . . . and wouldn’t this make a great gift idea for a teacher? It’s not hard to decoupage a clipboard, so if you are a beginning Mod Podger, you might want to take one on. Here’s how I did it.
DIY Clipboard
Gather These Supplies
- Clipboard – online and available at craft stores, but you might be lucky enough to find one at a thrift store (I’ve seen them there)
- Mod Podge Gloss
- FolkArt acrylic paint – Sky Blue
- Spray paint
- Scrapbook paper – I used K & Company
- Ribbon and embellishments
- Craft glue
- Paintbrush
- Ruler
- Pen
- Craft knife
- Scissors – for trimming
- Brayer (optional)
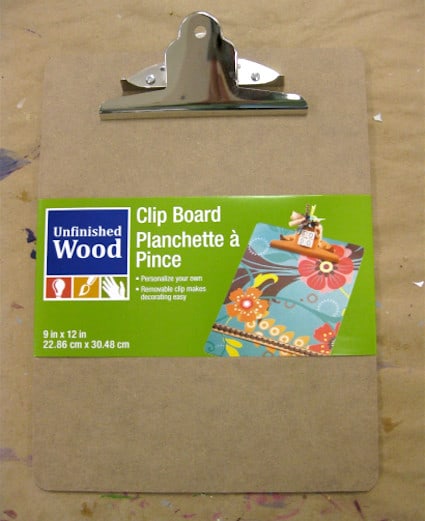

Brown clipboard. Boring. I think I just fell asleep looking at it.
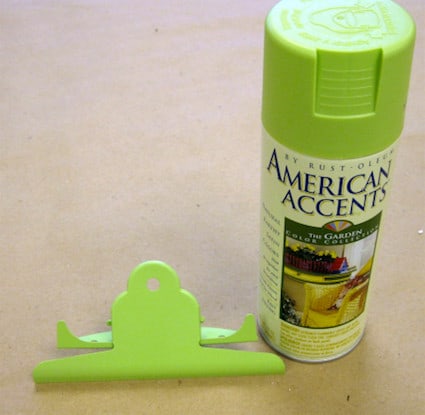
Remove the hardware (it’s easy, there are screws on the back) and spray paint it. This will give you a smooth coating on the metal. let it dry.
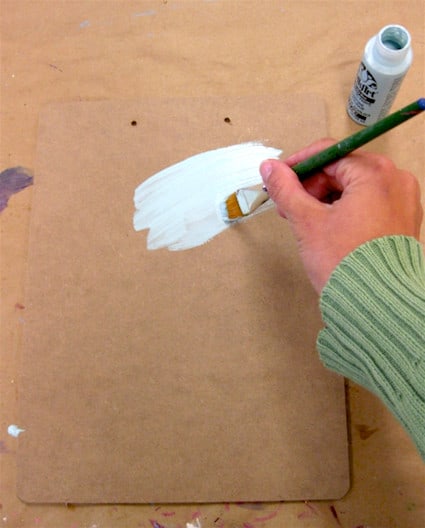

Paint the wood portion of the clipboard with acrylic paint. Give both sides of the board several coats and let dry.

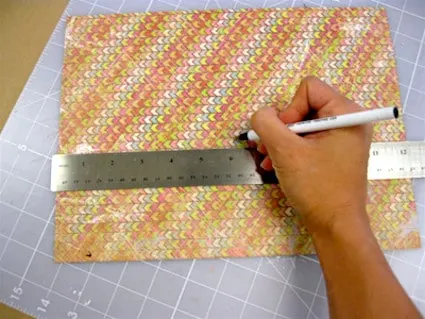
While the clipboard is drying, measure and cut the paper. I used two sheets with the intention of creating a seam in the middle.

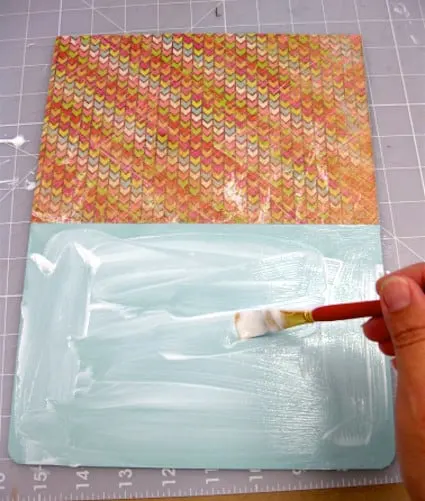
Add a medium layer of decoupage. Too much is better than not enough.
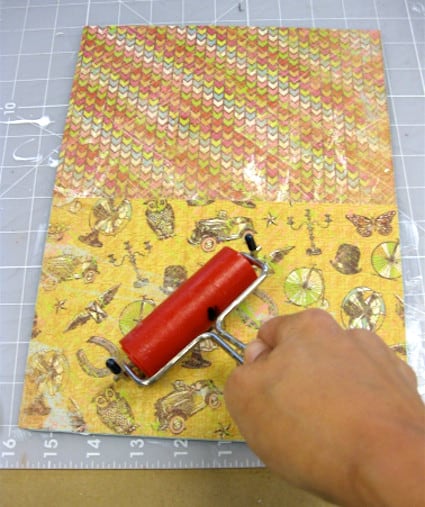

Use a brayer or your hands to completely smooth the paper down – wipe away any Mod Podge that squeezes out the side.
Let the paper dry for 15 minutes at the least, then coat the entire board with two coats of Mod Podge.
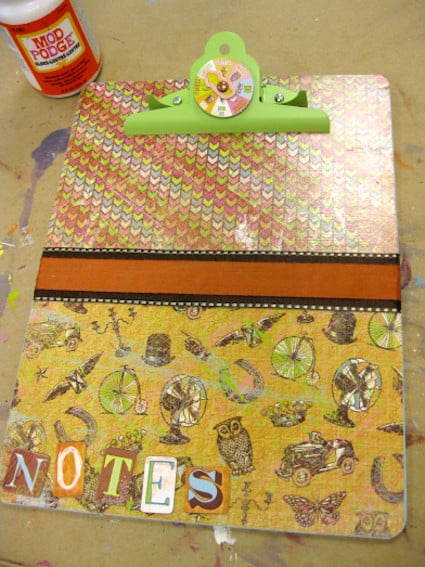
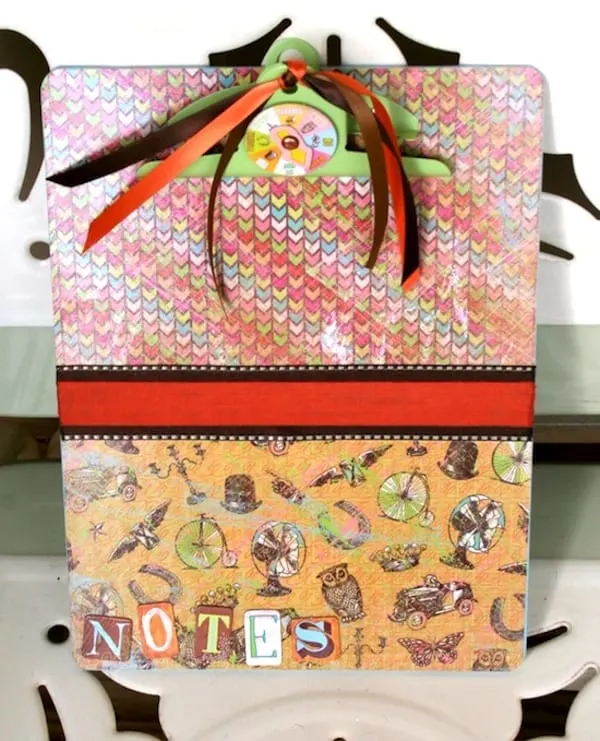
Re-attach the clip and add embellishments (such as letters and ribbon) with craft glue. Let everything dry.
I tied ribbon to the top of my DIY clipboard – and that funny little sticker is a mood spinner. Hahaha! Fun, huh?
DIY Clipboard
A Mod Podge clipboard makes a great gift idea! Learn how to decorate a clipboard with scrapbook paper and decoupage medium.
Materials
- Clipboard
- Mod Podge Gloss
- Acrylic paint
- Spray paint
- Scrapbook paper
- Ribbon and embellishments
- Craft glue
Tools
- Paintbrush
- Ruler
- Pen
- Craft knife
- Scissors
- Brayer (optional)
Instructions
- Remove the hardware from the clipboard and spray paint it. Let dry.
- Paint the wood portion of the clipboard with acrylic paint. Give both sides of the board several coats and let dry.
- While the clipboard is drying, measure and cut the paper.
- Add a medium layer of decoupage. Too much is better than not enough.
- Use a brayer or your hands to completely smooth the paper down - wipe away any Mod Podge that squeezes out the side.
- Let the paper dry for 15 minutes at the least, then coat the entire board with two coats of Mod Podge.
- Re-attach the clip and add embellishments (such as letters and ribbon) with craft glue. Let dry before using.
Did you enjoy decorating a clipboard? Then you’re probably going to love these other craft ideas:
Maria Solorio
Tuesday 23rd of January 2024
Thank you for such a creative idea. I made a couple of them, however, one of the clip boards seems to be causing my papers to stick to it. I am not sure if I used the correct Mod Podge, would this be the issue?
Heather
Tuesday 3rd of December 2013
Hi - Attempting my first decorative clipboards. Love the look of the painted clips. How do you get the clip off, tho?
Thx
Amy
Tuesday 3rd of December 2013
Hi Heather! Mine had screws on the back. If yours doesn't, I'd use painter's tape to mark it off while spray painting :D
Shanna
Saturday 27th of April 2013
Hey, how did you remove the "hardware" off of it? I am having trouble with that! HELP!
April
Tuesday 16th of July 2013
My solution to the hardware problem is this: I don't remove the hardware and just work around it covering it with paper the best I can. I always add a plethora of ribbon on top anyway so it covers any minor imperfections. While the Mod Podge is drying I hold the clip open with a zip tie(cable tie, that's what I call them anyway). I didn't paint my clip, but, if you wanted it painted, just paint it before covering the board in paper, I use scrapbooking paper btw.
Amy
Saturday 27th of April 2013
Hi Shanna! Mine had screws with nuts on the back that I could remove.
Leah
Saturday 9th of February 2013
The best paper to use is cardstock. When you use regular paper (like typing paper thin), YES, it does bubble up alot. In my area, I haven't found much patterned paper that is cardstock quality. It is mostly paper thin. Then you wouldn't get any bubbles using the modge podge.
Christy
Saturday 26th of January 2013
I just completed me first one and I have bubbles all in the paper; however the paper was completely flat before the Mod Podge . Help! Please!
Amy
Sunday 27th of January 2013
Hello! I recommend watching my videos at youtube.com/modpodgerocks - I think some of the tips there will help you!