
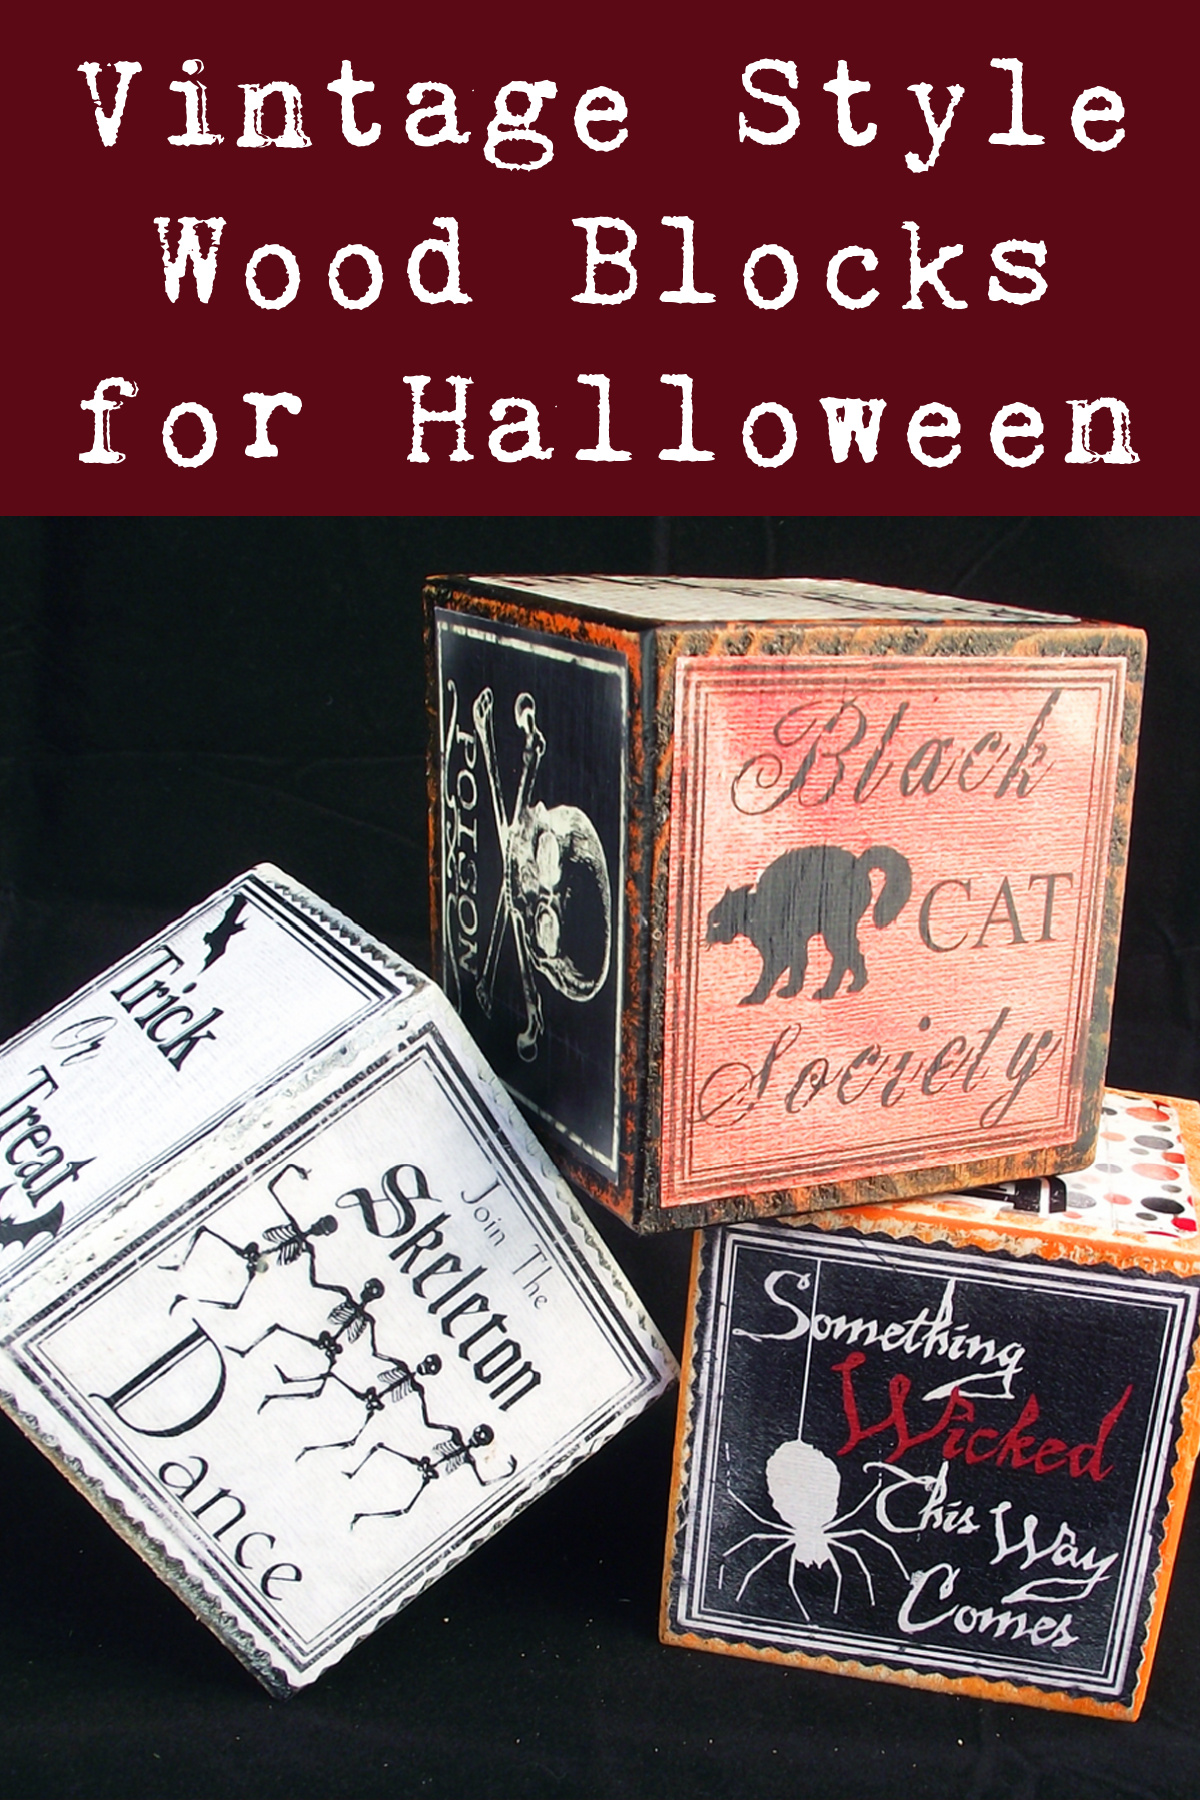
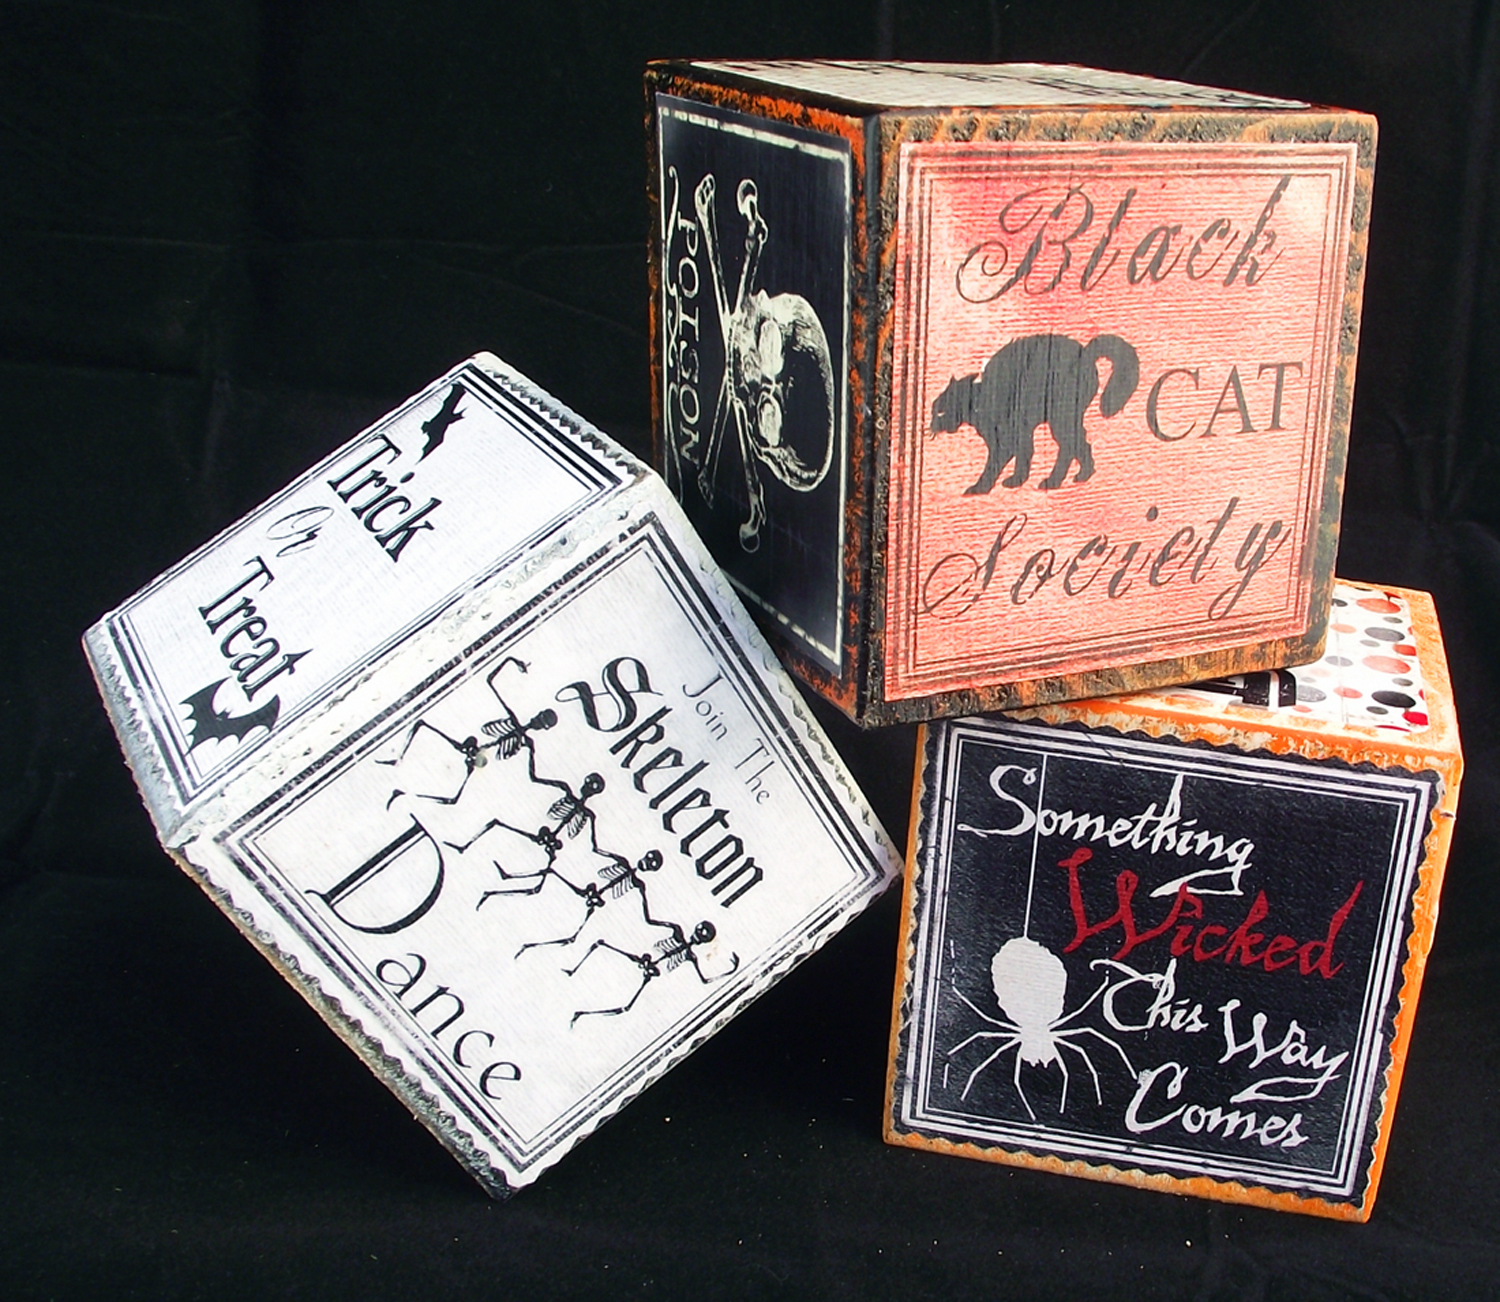
If you love the vintage look, try adding these DIY Halloween blocks to your decor. They are very easy and can be used to display candles.
Skills Required: Beginner. It helps to have experience with acrylic craft paint and Mod Podge (to avoid wrinkles in the paper).
Hello Podgers! It’s time for Halloween – and in a big way. I’m ashamed that it’s almost the end of September and I have barely started my Halloween crafts. I gotta get on the stick this weekend. Black glitter isn’t going to sprinkle itself!
Luckily Man Podger David has begun Halloween crafting, so he is totally saving my butt this week with his Halloween blocks. These Mod Podged vintage Halloween blocks will make a great addition to your home decor.
Especially to those decorative mantles that so many of you do. Here is the complete tutorial for these DIY Halloween decorations, straight from David.
It’s 98 degrees here in Los Angeles but my mind is on fall! These rustic blocks are a variation on the Halloween Tea Light Holders I sell in my Etsy store. This version is easy to make, inexpensive and, I think, very versatile.
DIY Halloween Blocks
You will need:
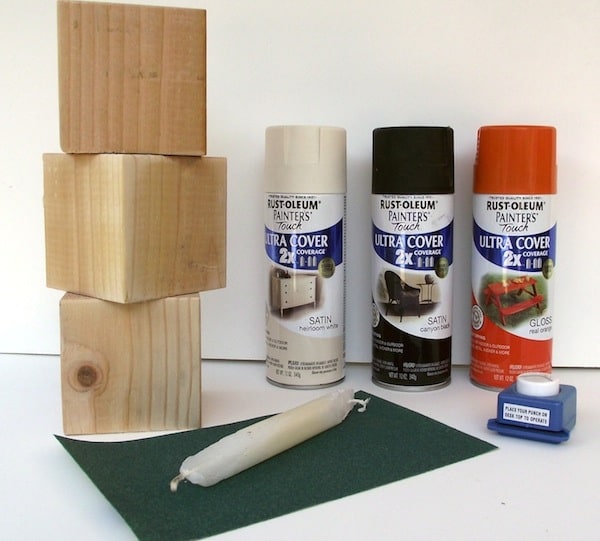
- 4 x 4 wood post cut down into 3.5″ wood blocks (due to the funkiness of lumber measurements, a 4 x 4 post is actually a 3.5 x 3.5 post. So to cut it into blocks you just need to slice off 3.5″ segments)
- Paint (I used spray paint but any craft paint will work just great)
- 100 grit sandpaper (a orbital sander is a time saver but you can totally do this with elbow grease)
- A candle
- Mod Podge Gloss and foam brush
- Paper – you can use old scrap paper or, if you’re like me, design your own using MS Word, clip art and images from The Graphics Fairy
- Edge cutters (pinking shears, a corner round) – optional
- Clear spray sealer
Cut your 4 x 4 post down to 3 ½ inch blocks – they can do this for you at most hardware stores or you can do it by hand. I gave the blocks a light sanding just to avoid splinters, but I didn’t want them too smooth as I want to make use of the rough texture.
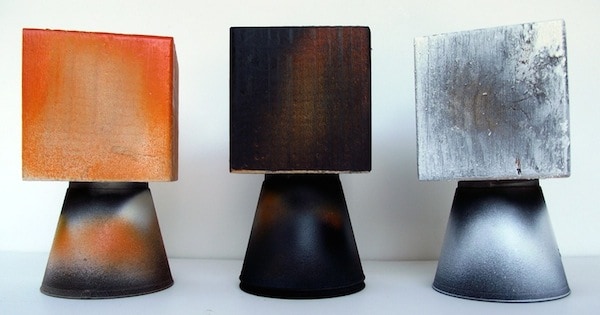
After that it was just a quick coat of my base colors on the sides, top and bottom. One coat is all that’s needed and having uneven amounts of paint is the goal so I painted heavily in some spots and very lightly in others and set them aside to dry.
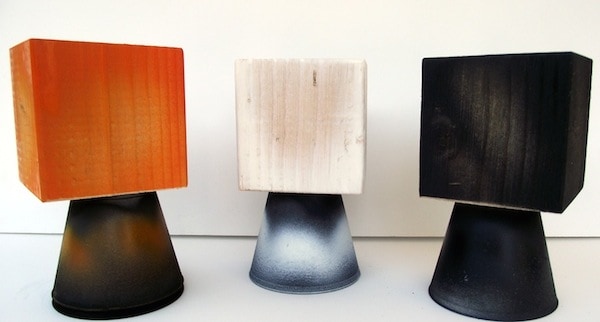
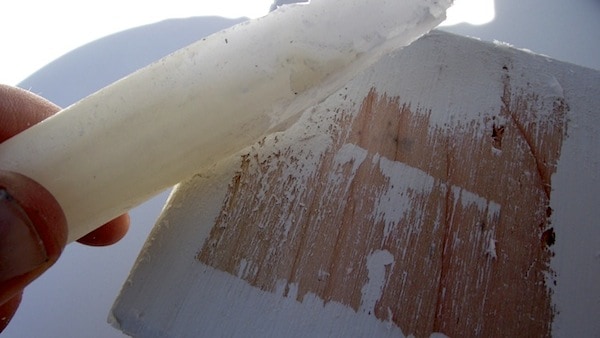
After the paint dried I simply rubbed the blocks with my candle hitting spots on the sides, edges and top wherever I wanted my base coat color to show through.
Then it was time for my contrasting color top coat. So I top-coated my white block with orange paint, my black block with white paint and my orange block with black paint and allowed them to dry.
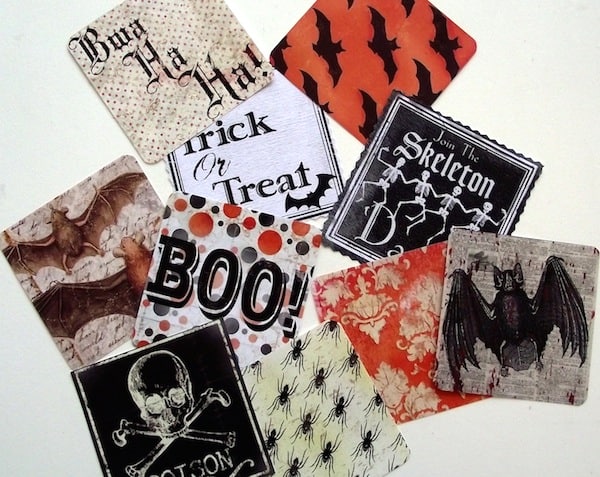
While they were drying I gathered my paper. You can use clip art, scrapbook paper, scrapbook embellishments, old photos – pretty much anything you can come up with.
I cut all my paper down into 3 ¼ x 3 ¼ inch squares and then rounded the corners or cut them with pinking shears.
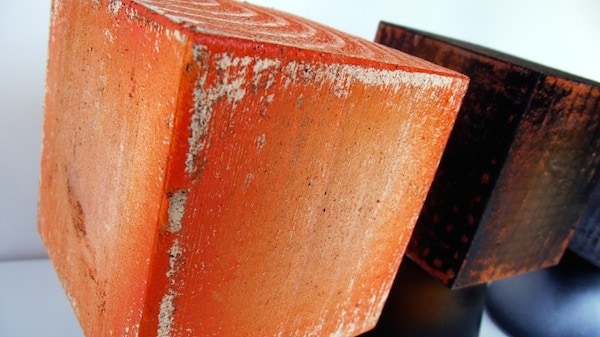
By now the paint had dried and it was time to sand away the wax revealing the base color underneath and all the nooks and crannies in the wood.
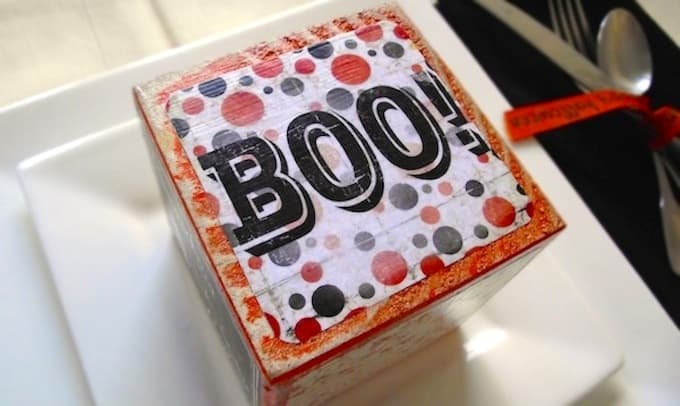
At this point I’m always tempted to just leave them as they are but I never can resist adding the images. So I just Mod Podged my squares to the sides and top of the blocks.
I didn’t even have to worry much about wrinkles or bumps as they only add to the texture. I quick top-coat of Mod Podge and then, when dry, a polycrylic spray sealer. That’s all there is to this wood Halloween craft!
Get the printable how to card below.

Halloween Blocks
Equipment
Materials
- 3 Wood block(s) 3 1/2" square
- Mod Podge
- Spray paint orange, black, white
- Wax candle
- Sandpaper
- Halloween paper cut to 3 1/4″ squares
- Clear acrylic spray sealer optional
Instructions
- Spray paint the wood blocks, each with one of the spray paint colors. Let dry.
- Apply wax to the edges of the blocks with the candle. Rub on all edges.
- Apply contrasting paint top coats. Paint the white block with orange, the black block with white, and the orange block with black. Let dry.
- Sand away some of the paint on the edges (where wax was applied) to reveal the paint beneath.
- Cut the Halloween paper down to 3 1/4 squares – you'll need six pieces per block.
- Apply a layer of Mod Podge to one side of the block. Smooth the paper down and wipe away excess Mod Podge. Let dry. Repeat with the remaining sides.
- Apply a top coat to the block and let dry. Apply a finishing sealer and let dry (optional).
- Repeat with remaining blocks and display.
Did you enjoy this Halloween craft for adults? Then your next step needs to be a visit to these other Halloween tutorials. I hope you enjoy!
BOO Letters • Button Art • Cheesecloth Ghost • Coffin Tray • Decorating Wood Cutouts • DIY Wreath • Dollar Tree Wood Pumpkin • Door Hangers • Fairy Garden • Halloween Ornaments • Mason Jar Lanterns • Mummy Luminaries • Paper Cones • Potion Bottles • Spooky Candle Holders • Spooky Pumpkins • Wall Decor • Window Art • Witch Hat Garland • Wood Ghost Decor


I love these!!! I think these would look wonderful on my dining room table. Guess I need to get crafting!!
Omg!!,love love love these! If you are ever in middle Tennessee, please come craft with me!!!
HI,
These are so cute!!!! I wanted to ask if you print these with an ink jet printer & if so what do you do about the ink bleeding when you put Mod podge on it?
Thanks,
Hi Angeltuc! You have to do special things for sure – visit this page and search for “ink jet”:
https://modpodgerocksblog.com/learn-how-to-mod-podge/
Good luck!
Did you find some of the images on the Graphics Fairy? Having a hard time finding any if them! Very cool project, something I definitely want to do!
Hi Michelle! David found some of them on there, but also some in clip art. I’d do searches on Graphics Fairy for Halloween, but also do Google searches for “Free Halloween clip art” and then look in Microsoft Word clip art as well!
Hey Michelle,
Yes, a lot of the images are from the GF and some are from clip art books web site etc.
But, the fun for me is playing around. So, for instance the bats are from GF and then I layered the bat images on top of the old newspaper and handwriting (you can see them in the pics above).
Or the Skeletons are from a free clip art site and I added the text that says “join the skeleton dance” and the frame around it.
Hope that helps.
David
Oh wow, I just found this!! These are awesome! Thanks so much for crediting my site for some of the images!!
SO cute! I love this idea. Thank you for sharing.
liZ
(simplesimonandco)