
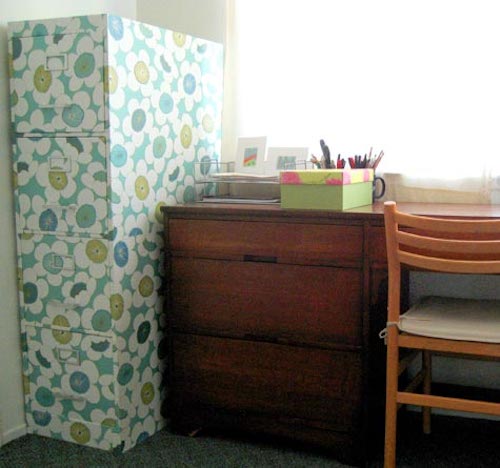
Re-do a filing cabinet with decoupage medium and wrapping paper. Use Hard Coat Mod Podge on your decoupage file cabinet for extra durability!
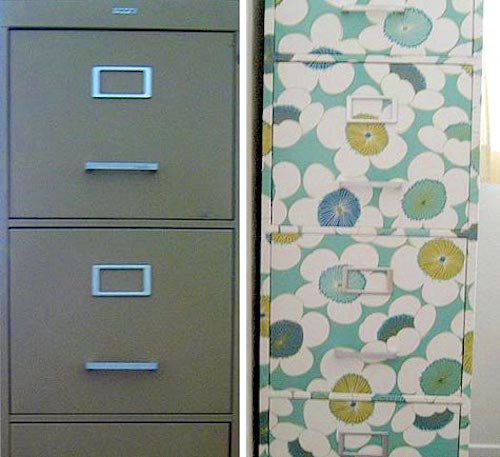
Can I tell you something? These metal file drawers used as the base of this decoupage file cabinet project are a dime a dozen at your local Goodwill. They have kind of gone the way of the rotary phone in terms of office decor.
Wrapping Paper File Cabinet
The good news? YOU can make something out of it that you wouldn’t be afraid to display in your office or craft room! Gunsgermssteel doesn’t provide instructions for this filing cabinet revamp, but a project like this is not hard. Here’s how I would do it.
Gather These Supplies
- Metal file cabinet (yes, you need a surface!)
- Wrapping paper (make sure it isn’t too thin are you are going to have big problems) – enough to cover the size file cabinet you have
- Scissors
- Craft knife and mat
- Spray primer
- Spray sealer
- Mod Podge! I recommend Hard Coat
First remove all of the hardware. If there are no screws, you can usually pop the stuff off with a screwdriver.
If you can, remove the drawers.
Spray the entire file cabinet, including the drawers, with primer. I recommend Krylon Spray Primer. And keep in mind – you can do one of two things at this point. You can spray the file with clear primer if you don’t care about the color. If you would like the file to coordinate with your paper, choose a colored primer.
Lay the wrapping paper out. This is the best thing to use for this type of project if you want a uniform look because you will get the width you need for coverage. You can also do a layered decoupage look with multiple papers!
Measure and cut the paper BEFORE you decoupage down. This is going to be kind of time consuming – but worth it! A craft knife like an X-Acto works great. Don’t forget the mat underneath! On the front sides, allow a little extra to wrap around toward the inside.
I would spray the wrapping paper with water before decoupaging it down. That will minimize bubbling. Allow the wrapping paper to dry for 15 minutes.
Begin decoupaging! I would use Hard Coat Mod Podge. It is specifically made to be very durable for things such as furniture. Work one section at a time. Apply the Mod Podge to the paper rather than applying it to the surface. This always works best for me.
Smooth the paper with a brayer or even a ruler. Be very gentle because a lot of wrapping papers are very “tearable!” Give the paper about 30 minutes to adhere to the file.
Cover the outside of the file with at least two coats of Mod Podge. You can lightly sand if you want to, or not. I always do – but it’s up to you!
Replace the hardware. Spray the entire outside of the file with a few coats of sealer. Allow to dry completely before replacing the drawers and using.
I know it seems like I add in a lot of steps, with spraying, sealing, etc. I will tell you that you can skip these steps, but I will always provide detailed instructions for those people who want added durability.
If you follow these steps, let me assure you this decoupage file cabinet will be around longer than you are!
If you enjoyed this decoupage furniture makeover, you might like these other home decor makeovers:


Why do you spray the wrapping paper with water? Which side do you spray?
When you say to spray the paper with primer, are you spraying the printed side or the under side?
Hi Kay! I spray both sides, personally.
Could these be covered with contact paper or wall paper? I love this idea as I have one old grungy file cabinet I need to cover and this seems so much easier than painting. Thanks for sharing!
Hi Bethel – you could probably do that too!
at last, a workable isea to hide the monstrous thing!
How much mod podge was needed for this project. btw – it look GREAT! I’m now inspired to do ‘anything’ like this to my old ugly friend. Thanks.
Thanks for the comment! This project inspired me to do filing cabinets of my own.
beautiful cabinet, I love it.